


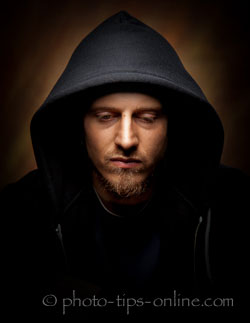
Portrait Professional is a world-renowned software that allows you to create great looking portraits with minimal efforts. One of our guest writers did a quick write-up on it a couple of years ago. This time around, we are taking a closer look at Portrait Professional 12, the latest version of the program.
Portrait Professional 12 is the world's first software that lets you control the lighting in your images AFTER you've taken them. Sounds too good to be true? Well, don't throw your lighting gear away just yet, you'll still need it :). Just read on to see what kind of new "magic" is now available on your computer.
Before we jump to the relighting (which is the most exciting thing about version 12 of Portrait Pro), let's cover some basics. As a first step, Portrait Professional detects a face (or faces) in the selected image. After that, you use a number of sliders to achieve desired results. You don't have to be skilled in Photoshop or any other "traditional" photo editing software to make your portrait look great. The user interface is extremely easy to understand and use, but at the same time, you have a huge degree of control over your images.
Portrait Professional is "trained" in human beauty, so you can select one of the included presets based on the subject's gender and age to get great results quickly. You can also adjust the master slider of any of the 8 major control sets found in Portrait Professional 12: face sculpting, skin smoothing, skin lighting, eyes, mouth and nose, hair, skin coloring, and picture. The master sliders allow you to start off with a preset and quickly tweak the image to your liking. Finally, you can take full control by changing values of any of the sliders nested under the master one. In some areas of adjustments, you can find a dozen of sliders or even two. So, if you are working on a large print of a single photo and want to fine tune every single detail, you will likely end up moving quite a few sliders. However, if you need to touch up a large number of photos, presets will do just fine. You can also create your own presets, say, for a group of similar photos, and use the batch processing feature to enhance them all quickly.
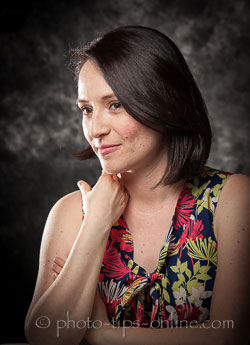
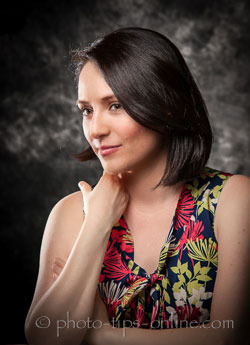
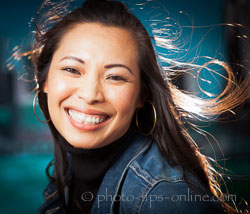
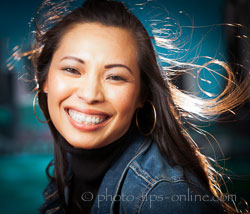
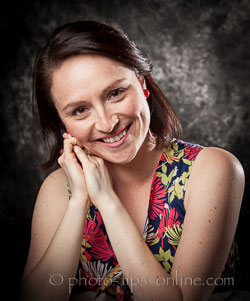
The images below give you an example of what can be done in just a few minutes to improve a portrait (the "before" portrait is on the left, and the "after" one is on the right).
 |
 |
Lighting (and relighting) in a software program is not something that we thought would be possible without having a 3D model of the subject (building a 3D model could mean, for example, getting a 3D scanner involved). Yet, Portrait Professional 12 is able to do some cool lighting tricks without any additional equipment. The technology only works on faces, so things like creating hair backlight or complete relighting of the scene are out of the question :). However, what Portrait Professional 12 does to faces is quite impressive. In fact, it looks like the software can build fairly accurate three-dimensional models of faces by analyzing regular two-dimensional photos. These 3D models are used to build lighting effects that are then blended with the original image, and the final results look amazingly realistic.
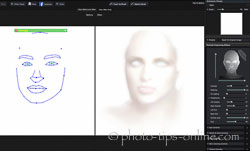
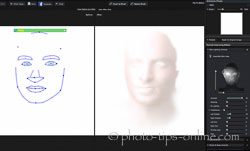
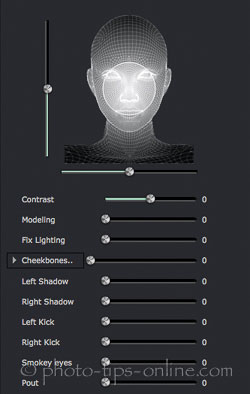
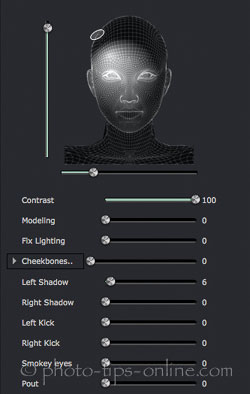
We did a little experiment and "forced" the program to do its lighting adjustments on a pure white image. Obviously, Portrait Professional 12 could not detect any faces, so we set the point for the main facial features manually, "tricking" the software into thinking that there is a face in the image. Then, we set the lighting controls to some reasonable values, and as a result, we were able to separate out the lighting effect layer. The screenshots below show what kind of "masks" can be composed with faces in your photos.
 |
 |
In Portrait Pro 12, you only get one light source that you can place in a hemisphere in front of the face in the picture. Not only you can freely position the light source but also you can change its size, which changes the contrast of the lighting effect. The brightness the software simulated light source is not available to you. It looks like Portrait Professional either uses a fixed "power" for its face light or finds a balanced value for the brightness of the light to keep the results looking natural.
Below, you can see two different lighting control configurations with the corresponding results.
 |
 |
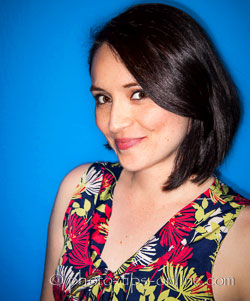 |
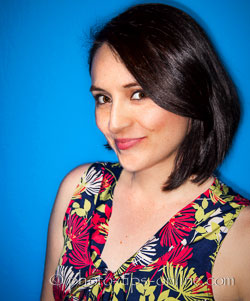 |
Besides the basic lighting controls like the light source size and position, the Lighting section of controls also includes a couple of "smart" sliders: Modeling and Fix Lighting. The Modeling one changes the face lighting so that the subject looks more attractive (Portrait Pro "understands" human beauty, remember? :)). We found that this slider was very useful for quickly adding some glamour to photos and, in general, improving the lighting. The Fix Lighting slider corrects "defective lighting" on the face (according to the help button). We are not entirely sure what this slider does, but it looks like it makes the lighting somewhat flatter. We have not found a lot of use for this particular adjustment on its own, but we could get some good results when combining it with the Modeling control.
The example below shows the effect of just the Modeling function. The original image is on the left, and the one with Modeling turned all the way up is on the right.
 |
 |
In addition to the already mentioned controls, there is a number of sliders dedicated to some specific areas of the face lighting. Let's give them a quick overview.
Cheekbone sliders help to accent cheekbones giving them more definition. We found this to be particularly useful in female portraits.
Smokey Eyes and Pout adjustments are also useful for emphasizing the glamour look where you might want to crank them up almost all the way. For non-glamorous shots, the smaller values could give a nice subtle touch that improves the overall appearance of the portrait.
The images below show the effect of all three adjustments applied at the same time (right image).
 |
 |
Left and Right Kick sliders simulate kick lights (the ones placed to the sides of the subject). We found that they are most useful, when you already have kick lights in your photo, in which case, you can tweak their effect. If you had no kick lights when taking a photo, adding them with Portrait Professional 12 usually renders unpleasant results (partly because, as we mentioned, relighting only applies to the face, meaning that the software-generated kick light would not hit the hair and may look artificial).
Left and Right Shadow controls add shadows to the left and right sides of the face, respectively. This feature can also be used to "dial down" the kick lights.
In the sample photo below, you can see how the side shadows "tighten" the lighting and make the portrait more dramatic.
 |
 |
After using Portrait Professional 12 for many weeks, we believe the relighting feature is quite magical. It delivers the right balance of correcting (and adding) lighting effects and keeping your photo realistic.
Portrait Professional offers a comprehensive set of features to improve the portraits you capture. Some of these features we like and use more often than others. Besides our new favorite Relighting adjustments, we also find it to be really useful to control face sculpting, skin smoothing, and eyes enhancing.
Often times, taking care of the skin imperfections can be a tedious task (especially if you have to process a lot of pictures). Portrait Professional 12 can completely automate that, which for any working professional, means real money saved. You are in complete control of how you want the skin to look. With dedicated sliders like pores, imperfections, wrinkles, shine, texture, spots, and others, working with the skin is super easy.
In the following photo, you can see that the skin was significantly improved, while all the details of the image were still preserved. (You may notice some sharpening artifacts, but that was done in the original image.)
 |
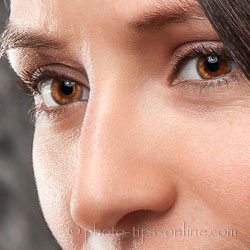 |
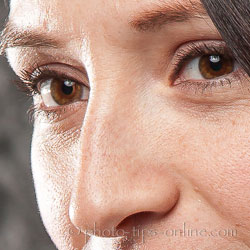
Enhancing eyes can be technically challenging. With Portrait Professional 12, it is a matter of a few seconds. In the above image, the white areas in the eyes are cleaned up a bit and the irises are brightened, which improved the appearance of the eyes. If you wish, you can also add eye catchlights of various shapes, from beauty dishes to chapel windows.
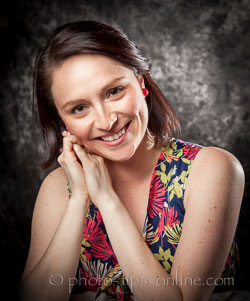
For many photographers, changing shapes of facial features is beyond their reach because it requires relatively high level of Photoshop expertise. Yet, it can be very useful to be able to do minor adjustments in the sculpting area for many portraits, from candid to studio shots. Well, with Portrait Professional 12, everybody can do it effortlessly. Not only you can correct defects of the face structure but also fix your own photographic errors. For example, in the following photo, because of the camera angle, the forehead of the model appears slightly bigger that it should. Within seconds, we were able to take care of this issue (the right photo below).
 |
 |
If you already use Portrait Professional 11 or any of the previous versions of the software, you might be wondering whether it's worth upgrading to version 12 or not. In our opinion, the answer is simple, and the answer is yes. It is not just the lighting feature. It is also the number of improvements throughout the whole product that can justify the purchase for any working professional. (You can also review the complete list of changes in version 12 on the developer's website.) As a current customer, you can get a 10-15 percent discount, which is not much, but better than nothing :)
In the previous version of Portrait Professional, optimization for 64-bit processing was only available in the high-end edition of the program. With Portrait Professional 12, all editions take advantage of 64-bit operating system architectures. Without getting too technical, we just want to say that the new 64-bit version works faster. We have not run any sophisticated tests, but using the 64-bit and 32-bit versions side-by-side on the same computer demonstrated a noticeable improvement in speed.
The Standard edition of Portrait Professional 12 is meant to be used with JPEG and TIFF images, while the Studio one offers plug-ins for Lightroom, Photoshop, and Aperture, as well as RAW and DNG format support. Batch processing is limited in Studio, but the Studio Max edition will give you all the batch tools you need (this will almost double your cost, though). We decided to go with the Studio edition for now, but we might consider upgrading it to Studio Max at a later time.
We've been using Portrait Professional for a few years now, and we are still impressed with what it can do. Whether you are an amateur photographer or a pro, Portrait Professional 12 is a must have software for producing great looking portraits with ease. Achieving the same results in Photoshop requires way more skills, and even if you are armed with those skills, enhancing images in Photoshop often takes more time. Whether you are after natural looking portraits or making your way in glamour photography, Portrait Professional 12 is a great tool to own.
The only word of warning we have is that it's fairly easy to overdo an image, especially with the sculpting and skin enhancements. Make sure you understand your client needs, so you deliver the proper edit. Some people don't mind even heavy adjustments, but some don't like to be “beautified” too much. Find the right balance for each client and every session.
The price for Portrait Professional 12 ranges from $50 to $150 (USD) depending on the edition. We've seen it go on sale during holidays and other promotion periods. You can check out the current prices below.